During my visit to Spring IO 2019, I joined in on a presentation on the OWASP top 10 security issues and what tools there are to check for those.
It was a very interesting presentation and it also made me realize that security in applications is something I do not know much about, not yet anyway.
At another talk, one of the presenters demonstrated KeyCloak as an identification provider and management tool, which brings us to this blog post.
Why?
On its website the company calls itself a provider of open source identity and access management for modern applications and services. This is quite a promise, but it can also be used for existing more traditional applications.
Since 2013 they provide a java-based Authentication and Authorization Server. The company started as a part of a JBoss community project and has now been taken in by RedHat. And another nice feature is that it’s open source and if needed you can extend it as you need.
The main features comprise:
- SSO (Single sign on/out)
- Uses standard protocols: OAuth 2.0, OIDC 1.0, SAML 2.0
- Flexible Authentication and Authorization
- Multi-factor authentication (one-time passwords with a secondary medium to provide authentication)
- Social login integration (Google, Facebook, Twitter, GitHub, … )
- provides centralized user management
- Support with directory services (LDAP integration e.g.)
- Customizable and extensible
- Easy in setup and integration
- Developer friendly
Hands on
As a demo, I will walk you through the setup of a Spring boot application with KeyCloak.
To start using KeyCloak, you can just download the server software they provide from their website. Unzip the zip file in a folder of your liking and run the standalone.sh/bat in the bin folder.
Now you can access the administration console of your KeyCloak server: http://localhost:8080/auth.
At the first run, you are asked for an admin user and password. Afterwards, you can click on the link to the main admin console where you can set up a security realm with several users.
Out of the box a demo realm named acme is defined. For this demo I’ll aptly rename it to ContinuumSecure. And it looks like this in the console:
In the past, when implementing a user sign in screen and keeploggedin functionality, it was always a long and difficult task, with lots of stress and problems along the way. KeyCloak provides you numerous possibilities out of the box.
Just by flipping a few toggles on the login tab, you can: add a user registration link, allow a user to login with their email address instead of the username, allow a user to change their password if they forgot and even force the login procedure to require SSL. You can even add themes to Keycloak to allow styling of the login page in the style of the application you are integrating with.
Where implementing such functionality yourself would take several weeks, it now only takes minutes. Which is a really impressing feature.
Another one is that when a user is logged in, you can provide a link to allow the user to update his or her account without needing an intervention of a developer or administrator, enable two factor authentication for the application or view all the application to which the user has access. And all of that is customizable to match the rest of your application.
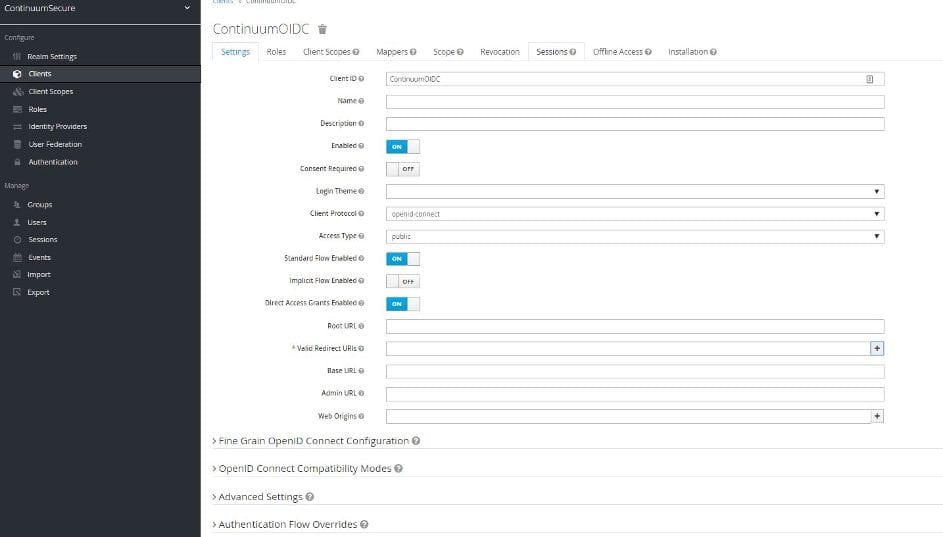
To connect your application to the realm defined in KeyCloak, you need to add a client for the application in KeyCloak. In the admin console this can be done in the second menu item on the left-hand side of the console aptly named Clients.
On the right you see the button to add a new client for your application. Click it and a new window opens to allow configuration of the client.
You can either import a client configuration or configure it yourself. Add a name (client ID) and select the client protocol, this can be OpenIdConnect or SAML.
After saving this new client setup, you can configure it further.
This allows the configuration of several application URL’s, to enable proper redirecting after authentication and so on.
On the second tab, you can create a number of roles for that specific client which you can later assign to a number of users depending on your use case. Roles can also be defined on a realm level and be used across different clients.
KeyCloak also allows to register different Identity Providers such as Google, Facebook, Github and other.
Furthermore, user federation can also be configured to connect to an existing Kerberos or LDAP setup within your company.
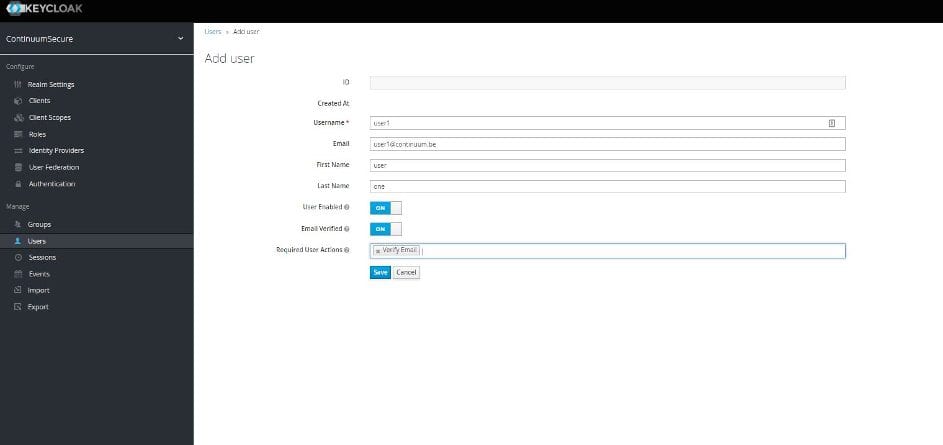
The last part I want to show you is the user management. With a few clicks, you can also manually set up user groups and accounts using the lower part of the left-hand menu.
And configure what actions they should do the first time they log in, like complete their profile, update the password or validate their email.
After creation, you see all the users and several administration features:
This is just a small pick of the features KeyCloak provides out of the box.
If that is not enough for you, since KeyCloak is open source software, you can always go about adding your own features.
SSO using KeyCloak
SSO or Single Sign On/out means once you are authenticated once, you are authenticated for all applications that use the same KeyCloak server. KeyCloak supports implementing this using both OIDC 1.0 or SAML 2.0. It also provides single logout functionality to logout once for all applications.
To integrate this in applications, KeyCloak provides adapters supporting the different standards and for specific implementations such as Spring boot, Spring Security, Angular, NodeJS, Tomcat, …
KeyCloak also provides reverse proxies. That way you don’t even need to integrate your application with it, just have it behind a protective shield and accessed via redirection.
To integrate KeyCloak with a Spring application using Spring security just complete the following steps:
Add the following starter dependency to your pom file:
					<dependency>
    <groupId>org.keycloak</groupId>
    <artifactId>keycloak-spring-boot-starter</artifactId>
</dependency>
And also add the dependency in the dependency management section:
					<dependencyManagement>
    <dependencies>
        <dependency>
            <groupId>org.keycloak.bom</groupId>
            <artifactId>keycloak-adapter-bom</artifactId>
            <version>3.3.0.Final</version>
            <type>pom</type>
            <scope>import</scope>
        </dependency>
    </dependencies>
</dependencyManagement>
After this is done, we need to let Spring Security know how to communicate with KeyCloak. To do this, add the following properties to the application.properties file:
					keycloak.auth-server-url=http://localhost:8080/auth
keycloak.realm=ContinuumSecure
keycloak.resource=ContinuumDemo
keycloak.public-client=true
The value we specify in keycloak.resource matches the client we named in the admin console.
Next, we add our dependency for Spring security. There is a Keycloak Spring Security Adapter and it’s already included in our Spring Boot Keycloak Starter dependency. We’ll now see how to integrate Spring Security with Keycloak.
					<dependency>
    <groupId>org.springframework.boot</groupId>
    <artifactId>spring-boot-starter-security</artifactId>
    <version>1.5.3</version>
</dependency>
Keycloak provides a KeycloakWebSecurityConfigurerAdapter for creating a WebSecurityConfigurer instance, this is needed for any application secured by Spring Security.
					@Configuration
@EnableWebSecurity
@ComponentScan(basePackageClasses = KeycloakSecurityComponents.class)
classSecurityConfig extendsKeycloakWebSecurityConfigurerAdapter {

    @Autowired
    publicvoidconfigureGlobal(
      AuthenticationManagerBuilder auth) throwsException {

        KeycloakAuthenticationProvider keycloakAuthenticationProvider
         = keycloakAuthenticationProvider();
        keycloakAuthenticationProvider.setGrantedAuthoritiesMapper(
          newSimpleAuthorityMapper());
        auth.authenticationProvider(keycloakAuthenticationProvider);
    }

    @Bean
    publicKeycloakSpringBootConfigResolver KeycloakConfigResolver() {
        returnnewKeycloakSpringBootConfigResolver();
    }

    @Bean
    @Override
    protectedSessionAuthenticationStrategy sessionAuthenticationStrategy() {
        returnnewRegisterSessionAuthenticationStrategy(
          newSessionRegistryImpl());
    }


    @Override
    protectedvoidconfigure(HttpSecurity http) throwsException {
        super.configure(http);
        http.authorizeRequests()
          .antMatchers("/secure*")
          .hasRole("user")
          .anyRequest()
          .permitAll();
    }
}
Some details about the config class above:
- The configureGlobal tasks the SimpleAuthorityMapper to make sure roles are not prefixed with ROLE_
- keycloakConfigResolver defines that we want to use the Spring Boot properties file support instead of the default keycloak.json
Now we add the following property:
keycloak.principal-attribute=preferred_username
This tells us that we want to retrieve the preferred_username from our Principal object injected from KeyCloak. This also needs to be configured in KeyCloak as being retrievable.
When this is done, we can extend our controller with a Principal object that is injected.
					@GetMapping(path = "/secure")
publicString secure(Principal principal, Model model){
    model.addAttribute("secureData", "This page is only for loggedIn users. Thank you KeyCloak!");
    model.addAttribute("username", principal.getName());
    return"securePage";
}
When we now resolve our view to for example a Thymeleaf template, we can retrieve the data as follows:
					<h1>Hello, <spanth:text="${username}">--name--</span>.</h1>
<div><spanth:text="${secureData}"></span></div>
Now, after we authenticate, we are taken to the secure page displaying the secure data and the principal username.
Thank you for reading and I hope I’ve introduced you to a great tool that you’ll enjoy using and integrating with your applications!

Tim Stockmans
Java Software Crafter
Tim Stockmans behaalde een Professionele Bachelor in de Toegepaste Informatica aan de toenmalige KHLeuven, nu UCLeuven . Tim is een gepassioneerd Software Crafter met een sterke interesse in alles wat te maken heeft met de nieuwste technologische ontwikkelingen en integratie in het dagelijkse leven zoals IOT, smart homes, …


